Category
9 min to read
Last Update on 05 May 2026
How to create a Predefined Templates in InkyBay
InkyBay’s Predefined template feature allows you to create and offer ready-made designs for products so customers can use those when customizing or purchase them instantly. If customers want, they can edit, add text, or change colors within the Design Lab.
How to Access Predefined Template
Follow a step-by-step guide to navigate to the predefined template feature.
Step 1: Hover over the Designs and click the Predefined Templates.
Step 2: Predefined Templates, all settings.
Template category - Click the dropdown to select a template category (in which category you want to create your template).
Manage category - Click Manage Category to create a new template, and want to add a template to that category.
Click + New Template to start creating templates.
How to set up Predefined Template
Follow the steps below to set up a predefined template:
Step 1: Click on the + New Template to create a new template from scratch.
Step 2: After that, you’ll see a new window with several settings, as shown in the image below.
Title: Insert your template title.
Category: Click and select the category under which the template will be shown
Tags: Click to add tags so that your customers can search and find the template easily
Popular: Mark the popular tab to make the template shown as popular
Start Template Design: Click the button to start designing the template.
Step 3: Create a template/design idea. [Note: Check out the Create a Template Design from Scratch section for in-depth details.]
Create a Template Design from Scratch
As mentioned in (step 2), click the “Start Template Design” button, and then a window will appear as shown in the image below.
Here, you’ll see four main settings, such as:
Select Product: Click Select Product to choose the product for which you want to create the template. By default, a product will appear from your product list.
Edit Color: Click here to change the selected product’s color. The color will be changed as it was set in the "Create a Custom Product” section.
Add Design Object: You can preset design elements from here to your template so that your customers can choose and edit the template as they need.
Design Scope: The Design Scope is movable. Click and drag to put it in your preferred position on the screen and start designing. [Note: You can set any design restrictions for added design elements here.]
Template Scope: The template scope will allow you to set restrictions for the whole design.
Clipart scope: It will allow setting up restrictions for the particular design object (e.g., text, graphics) only. This will only be available when you put any design element in the design area of the product.
Add Design Object
Details of the Add Design Object options. If you don’t want to offer a specific option to your customers, simply uncheck that.
Add Text: Click to add preset text to the template
Add Graphic: Click and select preset clipart from here. You can also upload your own graphic from here.
Add QR Code: Click and generate a QR code, and add on the product as a design element from here
Upload File: Click here and upload a custom image (If you have an image file to be shown as design)
Name or Number: Click here to add a name and number field.
Browse Design Idea: If you want to get started/copy from one of your existing templates, click here to find other predefined templates (you will find all of your created templates here. By default, it is empty as you need to create templates.
Design Scope
If you don’t want to offer a specific option to your customers, simply uncheck that.
Default Template: Select and check this to set the whole design template as the default design for the current product. So, when the customers click on Customize It, the designer window will load this design (template).
Enable BG: If you want to enable background color and want to set a particular color as the background, check this box and provide the color hex code.
Template Scope
Under template scope, you will find:
All: Allow all template editing options; by default, it is set to all options. You can uncheck other options as needed.
Add Text: Uncheck this if you want to disable adding new text to this template.
Add Clipart: Uncheck this if you want to disable adding new cliparts/graphics to this template.
Add QR Code: Uncheck this if you want to disable adding QR code on this template.
Upload Photo: Uncheck this if you want to disable user uploading on this template.
Name & Number: Uncheck this if you want to disable adding Name & Numbers to this template.
Fit with Design Area (Only when loading from design tool): If you do not want to let the template (after selecting from the design tool) get stretched (resized) out to fit with the currently selected product (design area), uncheck this. By default, the template will load in the center position of the current design area of the selected product.
Auto Left Position (Only when loading from design tool): When a user browses and selects this template from the design tool, by default, the design template is loaded on the center, based on the selected product’s design area size. Uncheck this option if you want to load this template in the same left position as you created. This top position may vary based on the product design area you are creating with and on the current selected design area (if it is a different product with a different design area size).
Auto Top Position (Only when loading from design tool): Uncheck this option if you want to load this template in the same right position as you created. This top position may vary based on the product design area you are creating with and on the current selected design area (if it is a different product with a different design area size).
Browse Template: Click and check this box to let customers browse other available templates (all of your created templates will be here. By default, it will be empty as you need to create templates).
Clipart Scope (Set Restriction/Limitation to Design Elements)
Click on any placed clipart or design element to see the option in the Design Scope window. Here you’ll find several design elements, as the image shown below:
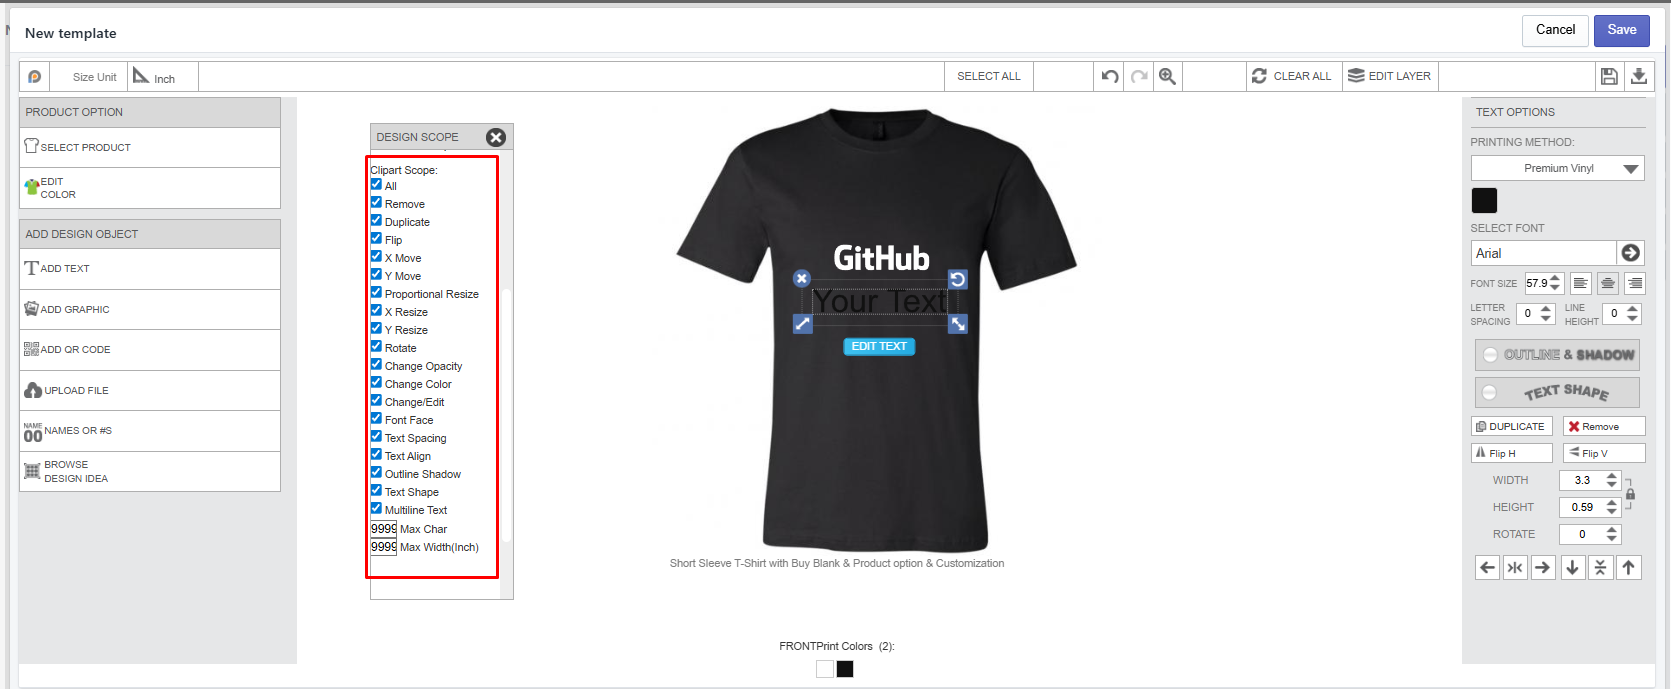
Details of each design element are the following:
All: Allow all editing options; by default, it is set to all options. You can uncheck other options as needed.
Remove: If you do not want to allow the user to remove this element, uncheck this. The front-end users can’t remove this element if they uncheck this.
Duplicate: If you do not want to allow the user to duplicate this element, uncheck this. The front-end user can’t duplicate this element if they uncheck this.
Flip: If you do not want to allow the user to flip this element, uncheck this. The front-end user can’t flip this element if they uncheck this.
X Move: If you do not want to allow the user to horizontally move this element, uncheck this. The front-end user can’t horizontally move this element if they uncheck this.
Y Move: If you do not want to allow the user to vertically move this element, uncheck this. The front-end user can’t vertically move this element if they uncheck this.
Proportional Resize: Hide the proportional resize option.
X Resize: Hide the horizontal resize option.
Y Resize: Hide vertical resize option.
Rotate the Hide Rotate option.
Change Opacity: If you do not want to allow the user to change the opacity of this for the element, uncheck this.
Change Color: If you do not want to allow the user to change the color for this element, uncheck this.
Change/Edit: If you do not want to allow the user to change/edit this (text/graphics) element, uncheck this.
Font Face (For Text Only): If you do not want to allow the user to change the font face for this text, uncheck this.
Text Spacing (For Text Only): If you do not want to allow the user to change text spacing for this text, uncheck this.
Text Align (For Text Only): If you do not want to allow the user to change Text Align for this text, uncheck this.
Outline Shadow (For Text Only): If you do not want to allow the user to change/add outline/shadow for this text, uncheck this.
Text Shape (For Text Only): If you do not want to allow the user to change/add text-shape style for this text, uncheck this.
Multiline Text (For Text Only): If you uncheck this option, the selected text object will allow text as a single line; the user can’t add multiline text while editing.
Max Char (For Text Only): If you want to restrict this text field to allow a maximum number of characters, enter the number here, like 5, 7, 12, etc. Or leave it as is with a large number, something like 99999.
Max Width (Inch) (For Text Only): If you want to restrict this text field to a maximum width, enter the number here, like 4, 6, 10, 12 (in inches), etc. Or leave it as is with a large number, something like 99999.
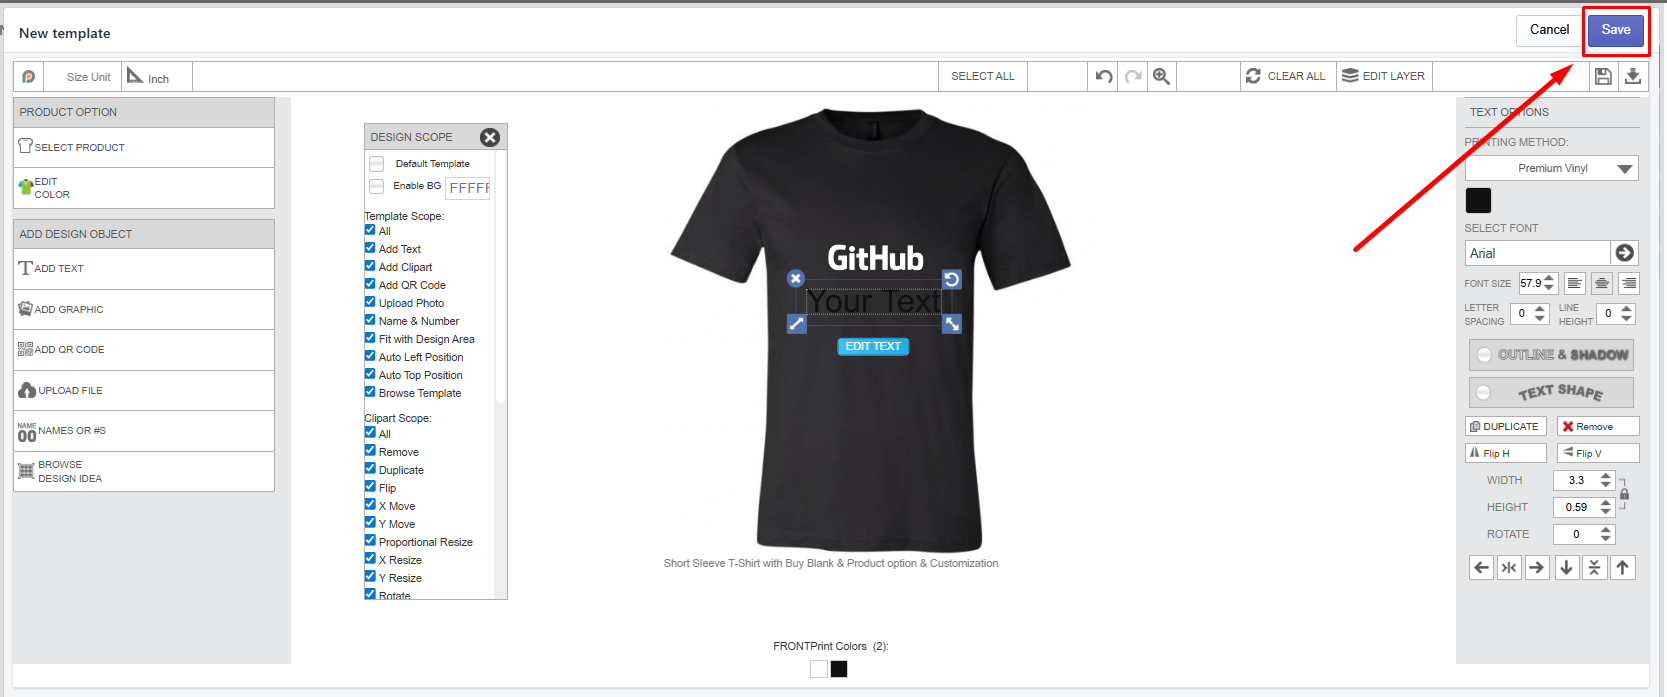
Save the New Template Design
After you complete your template design and set up any restrictions. Click the Save button to save the template.
Activate your Template
Now you have your own template designed for your customers. By default, the template should be activated. But, if the created design template does not show in the designer, you can follow these steps:
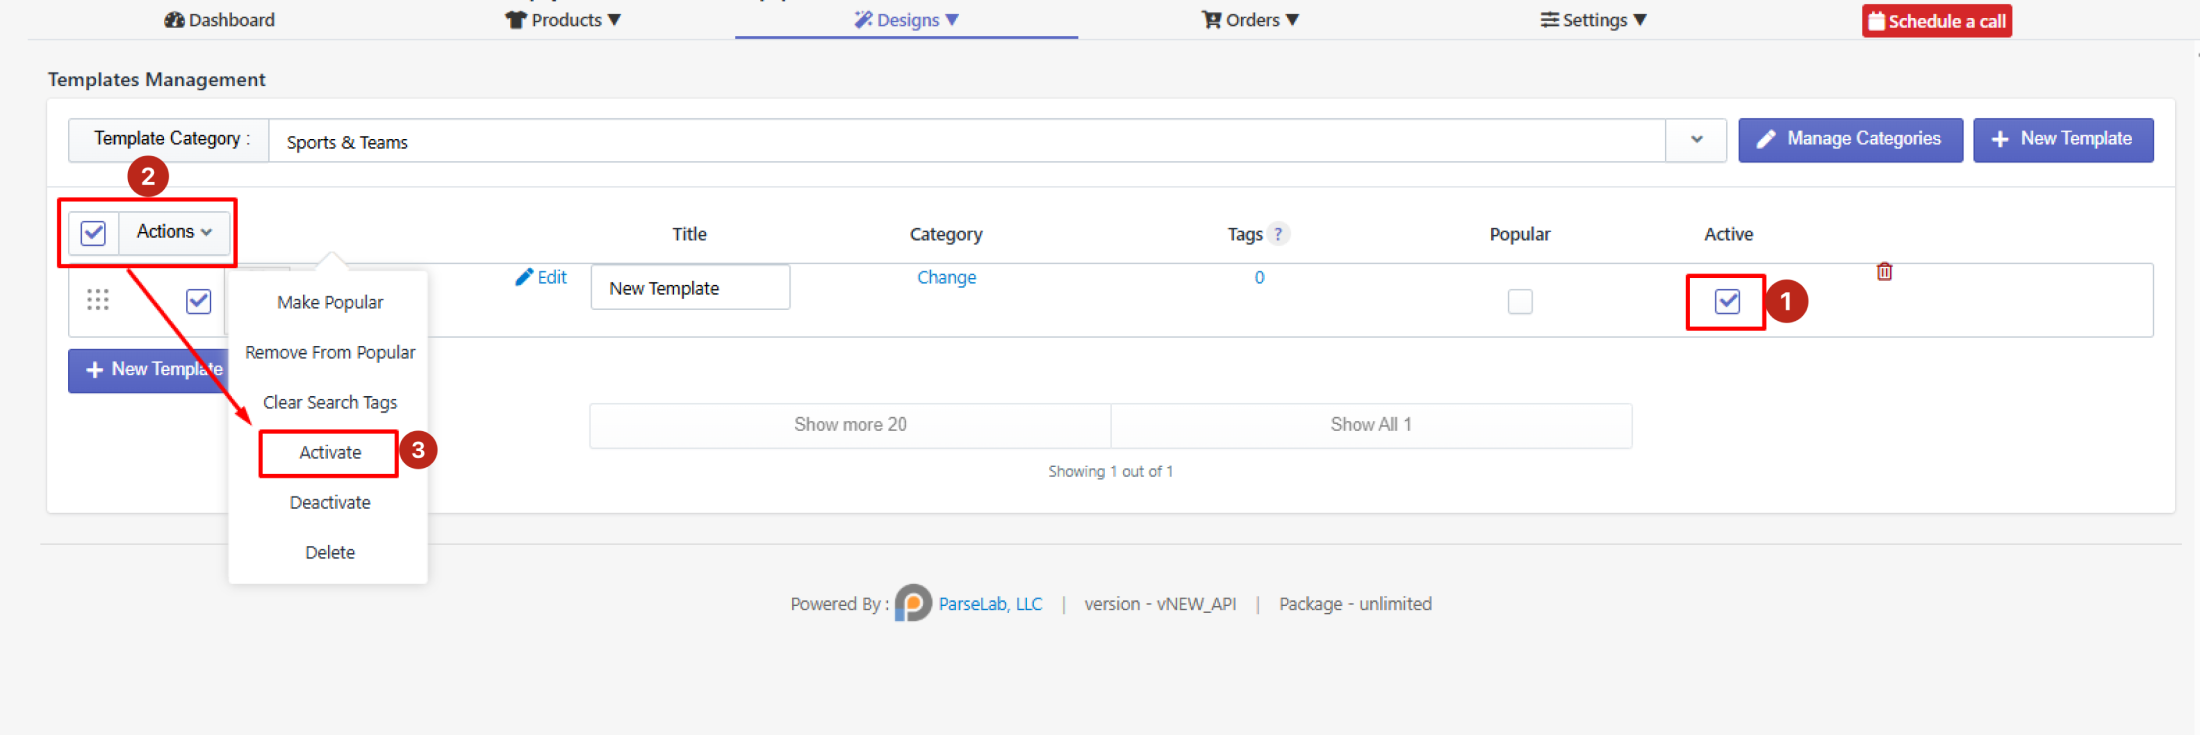
Step 1: Click and check the design template from the Template management window.
Step 2: Or you can also click on the Actions button.
Step 3: From the dropdown list, select Active, or simply click on the checkbox under the Active tab.
How to Manage the Template Category
Click on the Manage Category to create a category for your new template. This window will appear:
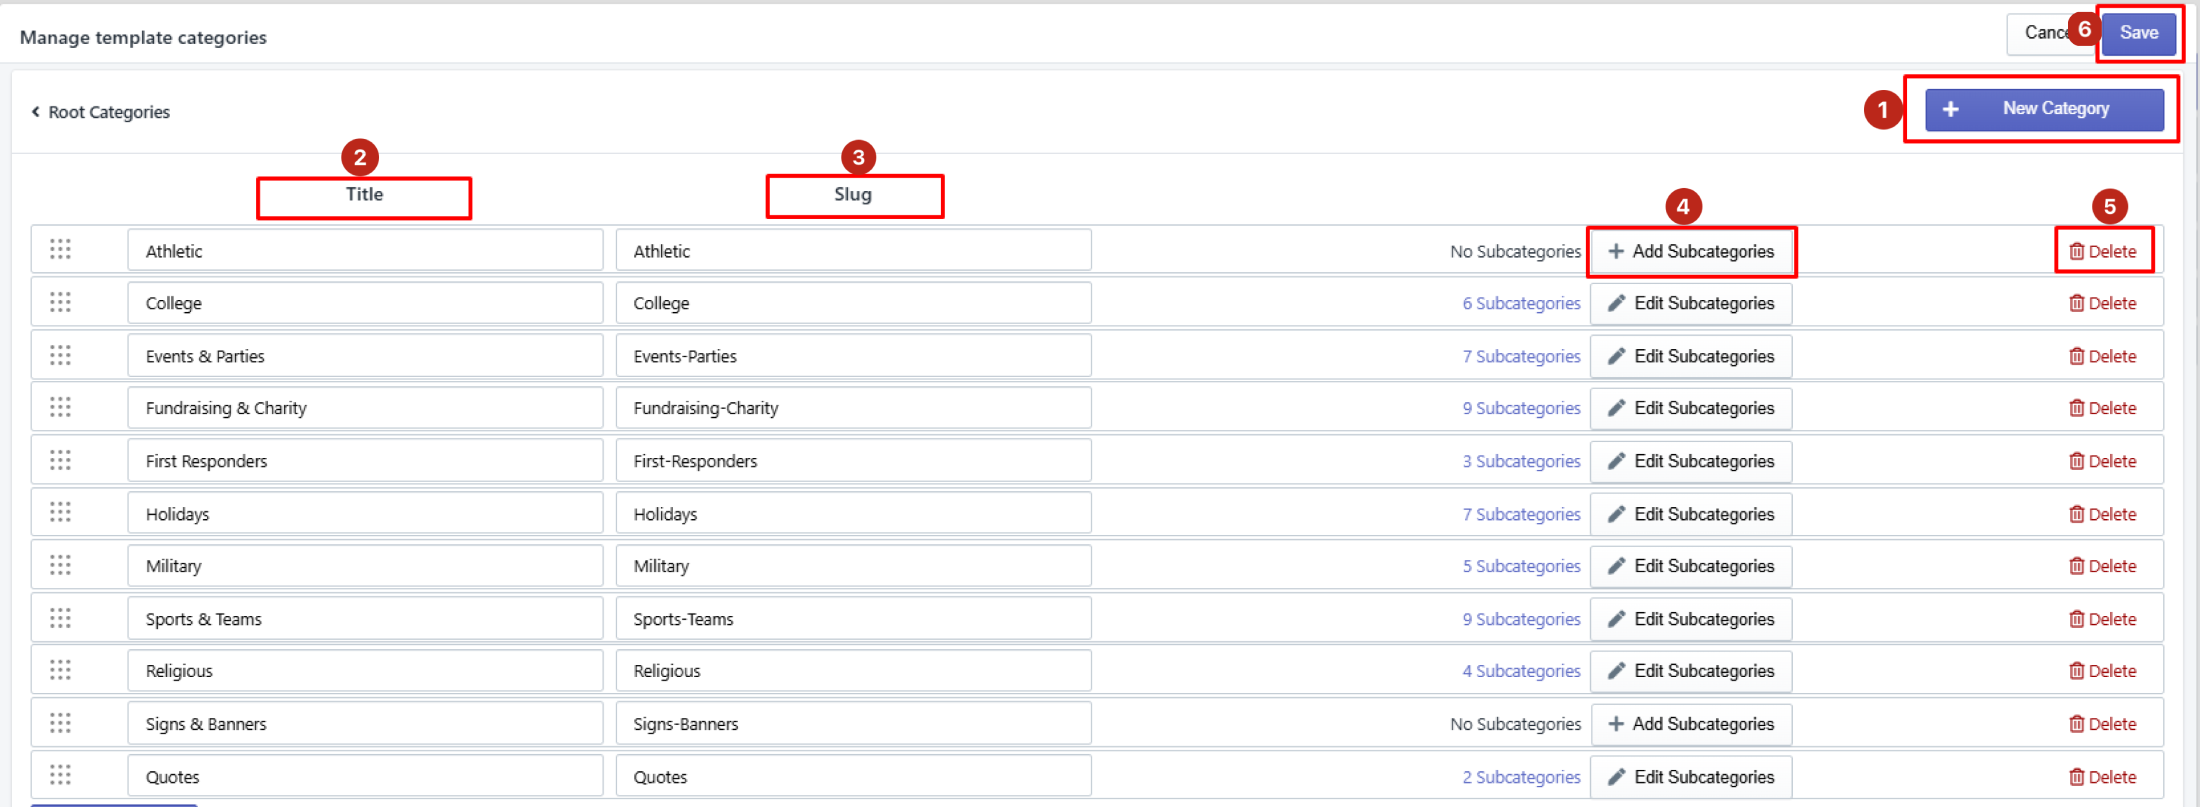
Below, we’ve discussed the settings details:
+ New Category: Click here to create a category field.
Title: Click here and provide a category title.
Slug: Click here and provide the category slug, which will be shown on the URL.
+ Add Subcategory: Click here to create any subcategory of your chosen template category.
Delete: Click on the red trash icon to remove any category.
Save: By clicking the save button, save your created category or subcategory.
Feel free to contact us whenever you face any issues or need assistance. We’re available 24/7. You can also reach us:
InkyBay app Live chat
Support ticket from the InkyBay app
Email to support@productsdesigner.com
Did this post help you?