To offer real-time product customization, you first need to make your product customizable.
With Inkybay, you can build a fully customizable product by adding options like sizes, colors, enabling image uploads, setting a specific design area, choosing printing methods, and applying tiered pricing or quantity-based discounts.
To get started, simply follow a few easy steps to customize your first product-
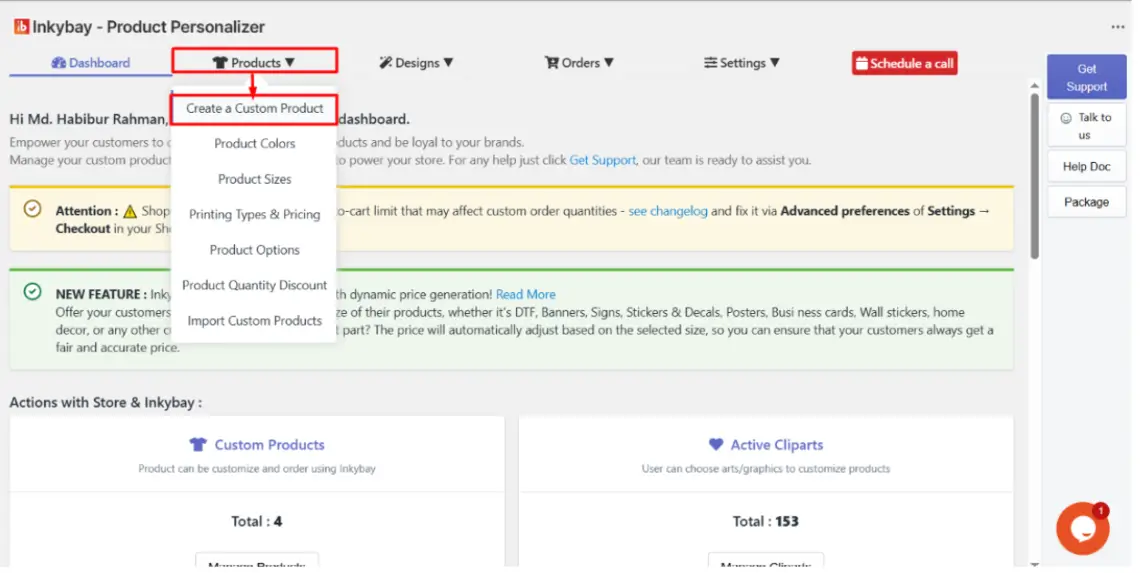
Hover over the Products, then select Create a Custom Product to view all your store products.
From InkyBay’s Products page, select the products you want to customize and click on Make it Customizable.
The image below shows the Products menu and the descriptions below it.
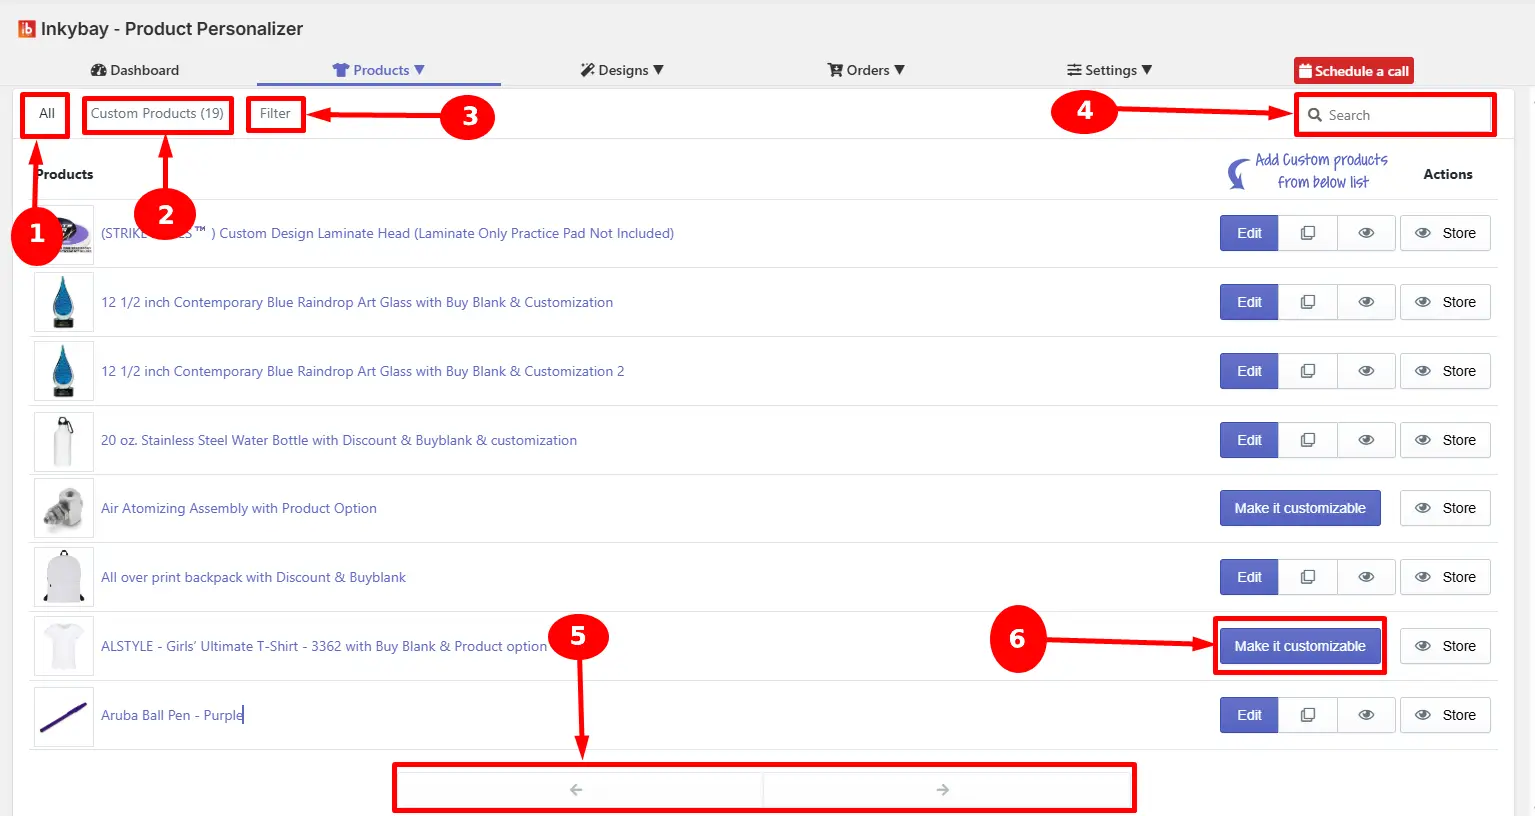
(1) All - This tab shows every product in your Shopify store (e.g., a total of 33 products in your store)
(2) Custom Products - This tab filters the list to show only products you’ve already made customizable (e.g., 19 products).
(3) Filter - Use this option to filter your store products by Collection, Type, Vendor, Tag, or Custom Search.
|
💡 Tip It is useful when you have a large catalog and need to locate a specific group of products. |
(4) Search - Type any part of the product name to find it.
(5) Page navigation - For a diverse product catalog, page numbers show. Use the page numbers or arrow buttons to move between pages.
(6) Make It Customizable - Once you have selected a product that you want to customize, click on the Make it customizable button beside it.
After clicking on the Make it customizable button, a new page will open. Here, you can see four key sections: Product Sizes, Printing Types & Pricing, Product Colors, and Product Setup for the design tool.

Product sizes: Select the available sizes for the product. Customers will only see the sizes you enable from here.
(1.1) Size Set dropdown - Select an existing size set from the dropdown.
(1.2) Edit Set - Click edit set to modify the currently selected size set by adding or removing individual sizes.
(1.3) +New Size Set - Create a completely new size set and assign it to the product.
2. Printing types & pricing: Select the printing methods and configure quantity-based discounts.
(2.1) Printing Types - Select one or more printing methods from the available list: DTG print, Screen print, Flex print, Premium Vinyl, Sublimation, and others.
🎯Note At least one printing type must be selected |
(2.2) Add/Edit Printing Types - To create a new printing type or edit an existing one to match your product customization requirements, click Add/Edit Printing Types.
(2.3) Quantity Discount - To add quantity-based pricing, click Quantity Discounts.
3. Product Colors: Select or create the product color set that helps your customers to choose their preferred color from the design tool.
(3.1) Select Color Set - Choose an existing color set from the dropdown. Product colors will be available based on the selected color set.
(3.2) Edit - Edit the current selected color set or remove colors from the color set.
(3.3) New - Click the + New button to add a new color set to a custom product.
(3.4) Default color swatch - Set the default color for the product that appears when a customer first lands on the product in the design tool.
4. Product Setup for Design Tool: Add product sides, upload product images for each side, and define the print area that customers design within.
(4.1) + Side - Add new product side/print location.
(4.2) New Side name - Your added side name.
(4.3) Upload Image - Upload image for this side.
(4.4) Print area - After image upload, you can set up the product print area/size based on your actual print requirements.
(4.5) Advanced Settings - Click on Advanced Settings to configure your product by uploading images, setting up print area, and for more customization setup.
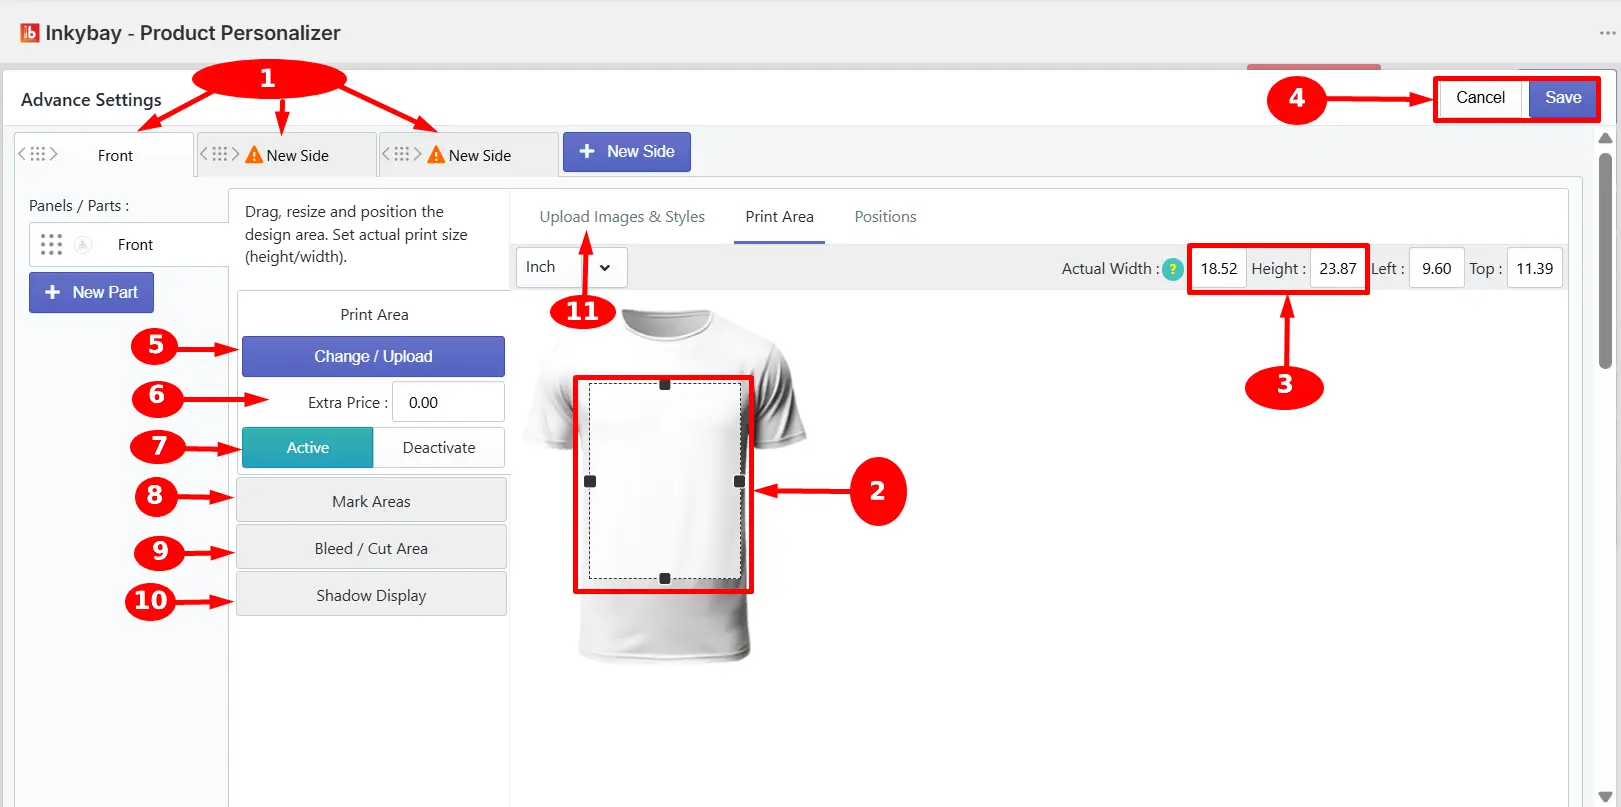
Define the exact print area for each product side, set actual print dimensions, and configure additional display and pricing.
Product side tabs - Front, Back, Left, or Right; click any tab to switch between sides and configure the print area for each one.
Print area boundary box - Click and drag the rectangle box to reposition it, or drag the corner and edge handles to resize. Place it over the printable surface of the product.
Width & height print area dimensions - Define the actual output file size so customers can design within.
Cancel/Save - Save or cancel the changes that have been made.
Change/Upload - Replace the default rectangle print area shape by uploading a custom PNG image. [Note: Use this option for products with circular or other shaped print areas.]
Extra Price - Enter a price for this specific product side, which is added to the customization price when a customer designs.
Active / Deactivate — Click the Deactivate button if you don’t want to allow customers to add designs on this side. Print area will be deactivated automatically for this side.
Mark Areas — Add one or more marked areas (Rectangular, Circle, Name block or Number Block) to display and define printing boundaries.
Bleed / Cut Area — Define a bleed or cut boundary, which is included in the output file and is used by print production to ensure accurate trimming.
Shadow Display — Click the button to upload a shadow or overlay image to display on top of the product in the design tool.
Upload Images & Styles — Click the button to switch between inches and other measurement units. [Note: Effective to change product mockup image, configure multi-panel, and product styles for specific sides.]
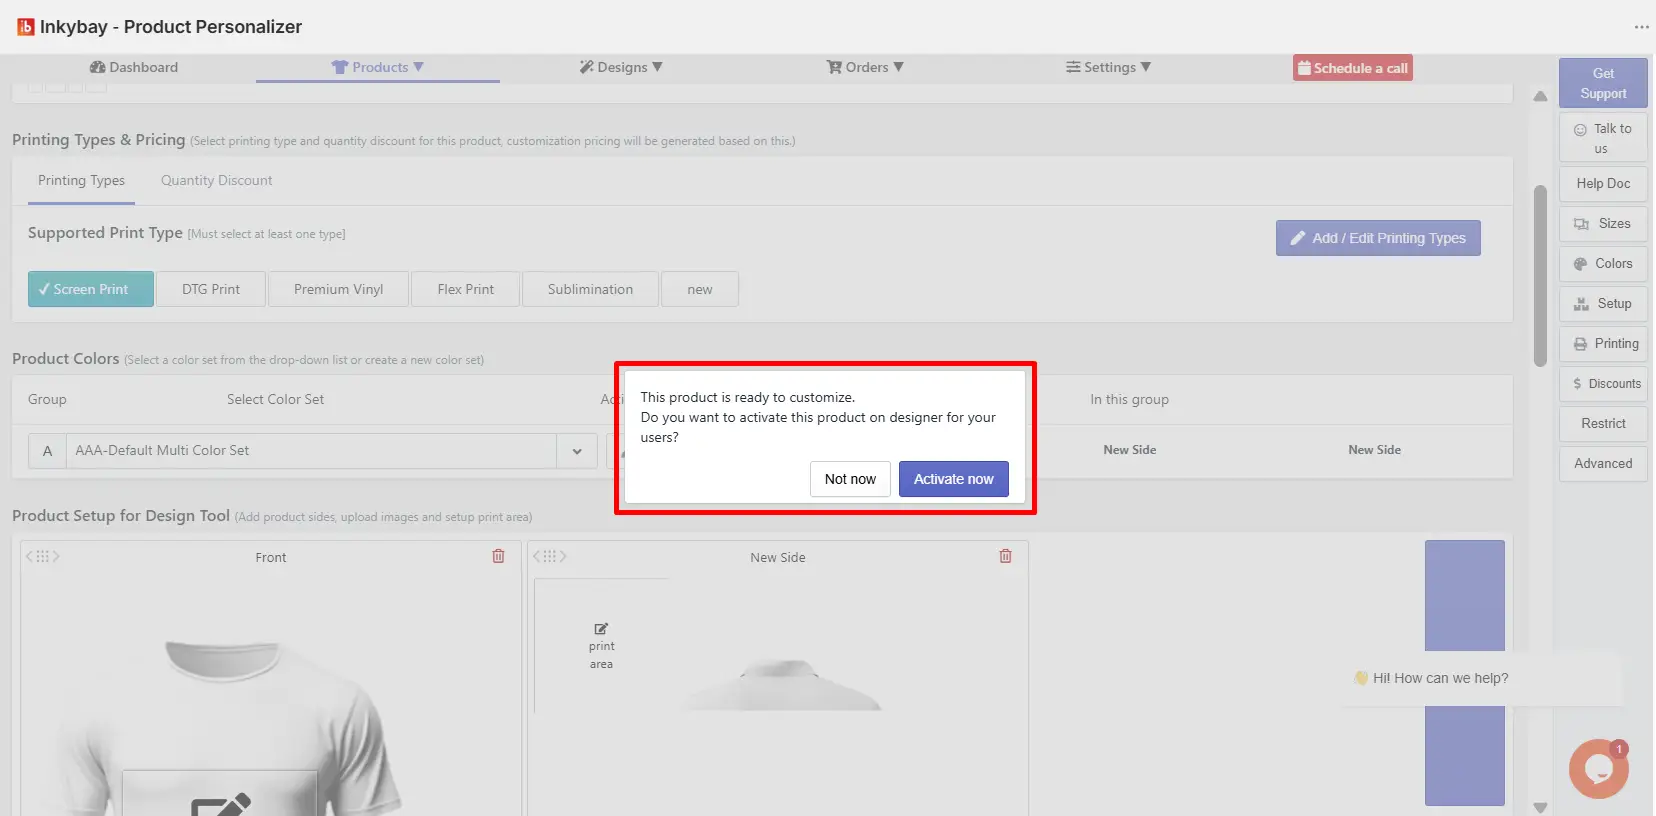
A pop-up window will appear that shows the image below. Now, click the Activate Now button, and your custom product is set to display on the storefront.
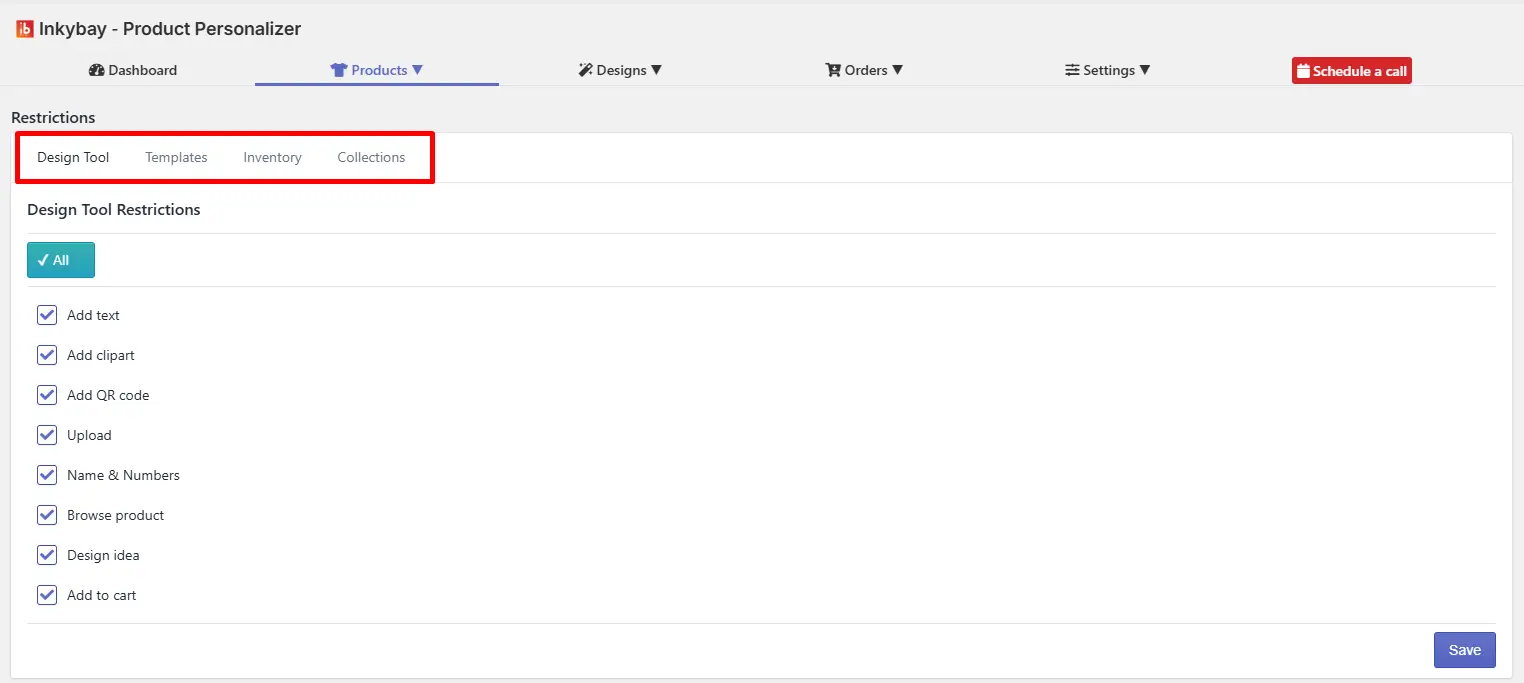
This feature allows you to control design capabilities, including:
Design tool: You can disable specific design elements (text, clipart, QR code, etc.) in the designLab for particular products.
Templates: Pre-defined templates can be created where users can edit text or images while restricting changes to the base product layout.
Inventory: You can track inventory for customized products by size, color, and style, restricting customers from placing orders when items are out of stock.
Collections: Products can be assigned to collections (e.g., apparel) and curated using existing ones or by creating new ones.
Still, facing difficulties or need help? Feel free to contact us. You can also reach us:
InkyBay app Live chat
Support ticket from the InkyBay app
Email to support@productsdesigner.com